From Sketch to Tech Pack: How to Make Your Makeup Bag Factory-Ready?
From Sketch to Tech Pack: How to Make Your Makeup Bag Factory-Ready?
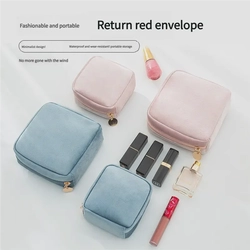
You've poured your creativity into the perfect makeup bag design. It's stylish, functional, and solves a real problem for your target customer. But that beautiful sketch is just the beginning of the journey. The chasm between a concept on paper and a consistent, high-quality product rolling off a factory line is bridged by one critical document: the Technical Package, or "Tech Pack." Without it, you're handing your vision over to interpretation, hoping a factory thousands of miles away can guess your intentions. The result is often costly errors, endless sample revisions, and a final product that doesn't match your dream.
A factory-ready tech pack is the universal language of manufacturing. It translates your creative vision into precise, unambiguous instructions that a factory can execute. It encompasses detailed technical drawings, a comprehensive Bill of Materials (BOM), explicit construction notes, approved physical samples for color and hardware, and clear quality standards. Investing in a perfect tech pack upfront is the single most effective way to save time, money, and frustration throughout production.
Navigating this translation from art to specification requires a methodical approach. Let's break down the anatomy of a professional tech pack and the process of building one that guarantees your vision becomes reality.
To master this essential skill, we will explore the four foundational pillars of a robust tech pack: the visual blueprint of technical drawings, the definitive inventory of the Bill of Materials, the critical language of construction specifications, and the structured process of sampling and approval that brings it all together.
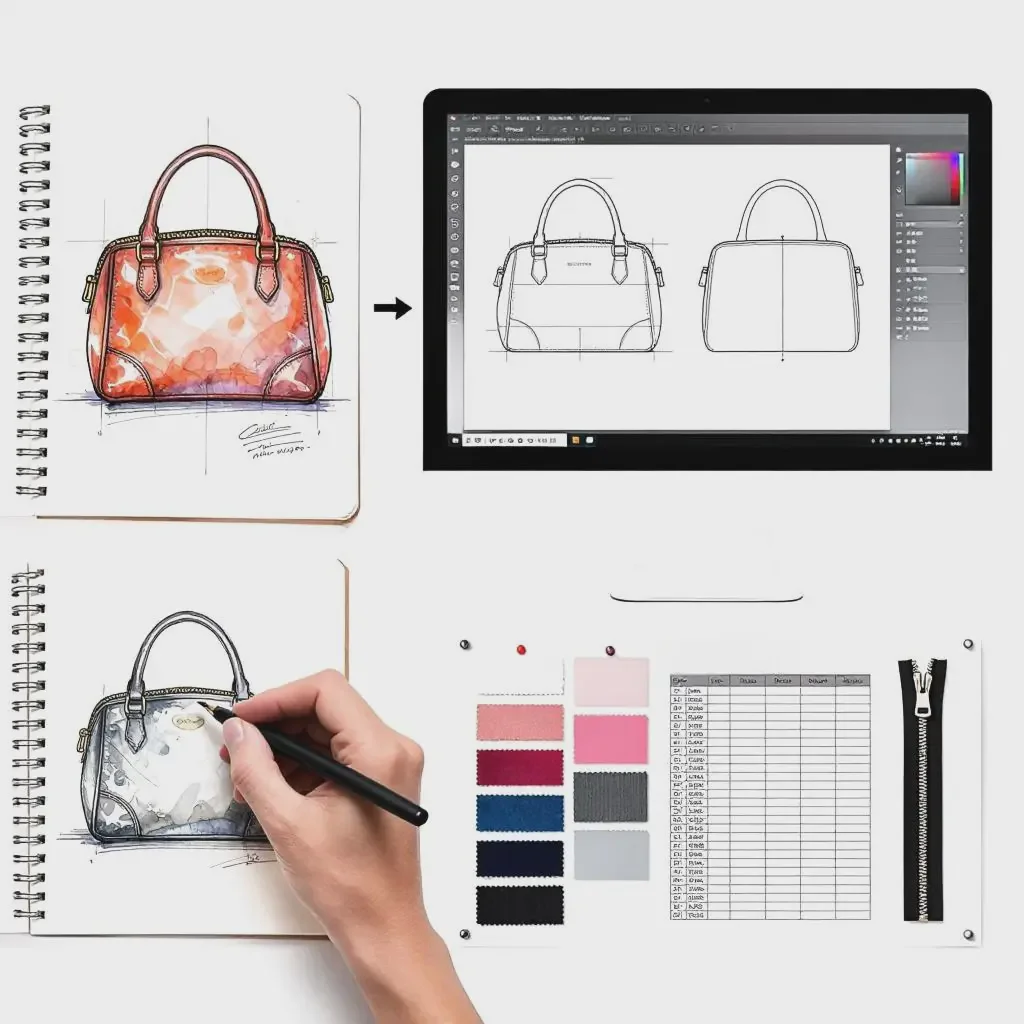
The Visual Blueprint: What Do Truly Effective Technical Drawings Include?
Technical drawings are the cornerstone of your tech pack. They move beyond artistic renderings to become measurable, unambiguous engineering documents that every person on the factory floor can understand, regardless of language.
Effective technical drawings are scale-accurate, fully dimensioned flat schematics that show every view of the bag (front, back, side, top, bottom, interior) and include detailed "callouts" for close-up sections like stitch types, pocket construction, and hardware attachment. They use a consistent graphic language of lines, arrows, and notes to eliminate guesswork about size, proportion, and assembly.
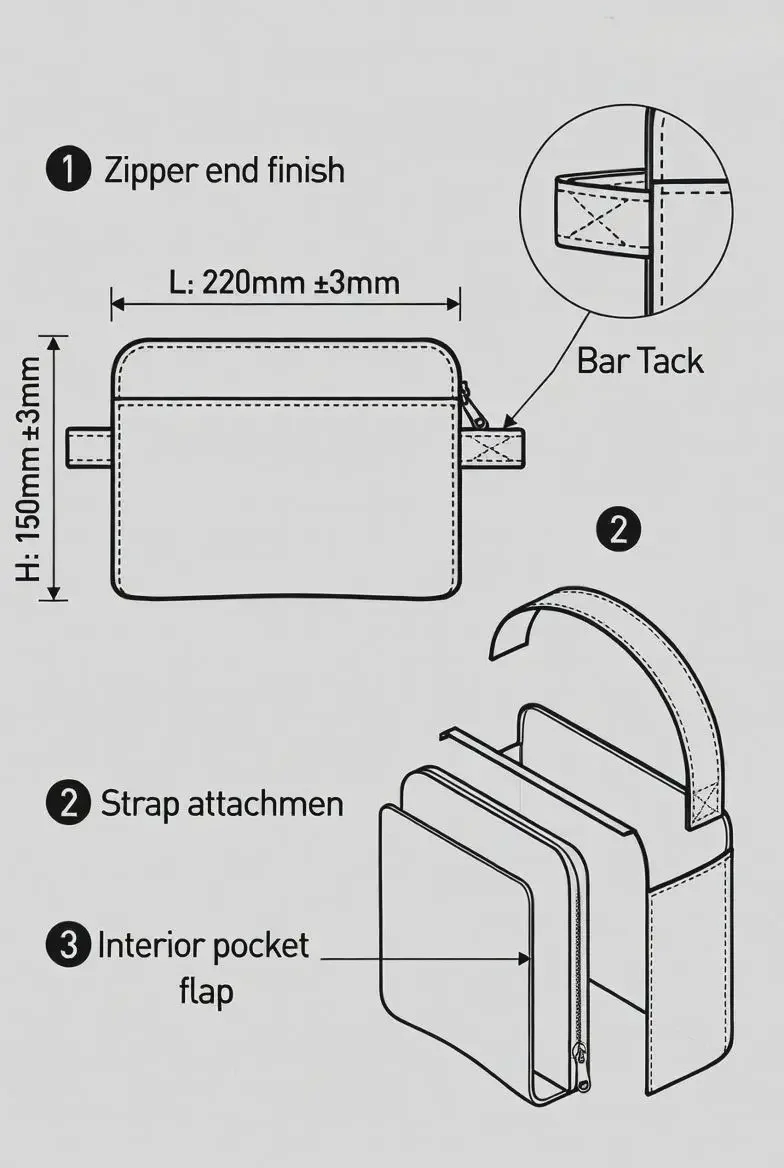
Start with a clean, flattened silhouette of your bag, drawn to scale (e.g., 1:2 or 1:4). Use a consistent line weight: solid lines for visible edges, dashed lines for hidden seams or folds. Every single dimension that defines the product's form and function must be specified: overall length, width, and height; gusset depth; precise placement and size of pockets, straps, and loops; zipper length; and the distance between hardware points like D-rings. Crucially, include tolerances (e.g., 220mm ± 3mm) to define the acceptable margin of error. Callouts, marked with circled numbers, zoom in on complex areas, specifying seam allowances (e.g., "All seams: 1/2" SA unless noted"), stitch types, and how components interface. This drawing is not art; it's a legally referable specification.
The Materials Bible: How Do You Build a Foolproof Bill of Materials (BOM)?
If the technical drawing is the map, the Bill of Materials (BOM) is the packing list for the journey. It is an itemized inventory of every single component that goes into your bag, leaving nothing to chance or factory assumption.
A comprehensive BOM is a spreadsheet that lists every item—from the main exterior fabric down to the last stitch of thread and the care label—with its exact material composition, color reference, size, quantity per bag, and preferred supplier or performance standard. This document is non-negotiable for accurate costing, sourcing, and ensuring production consistency.
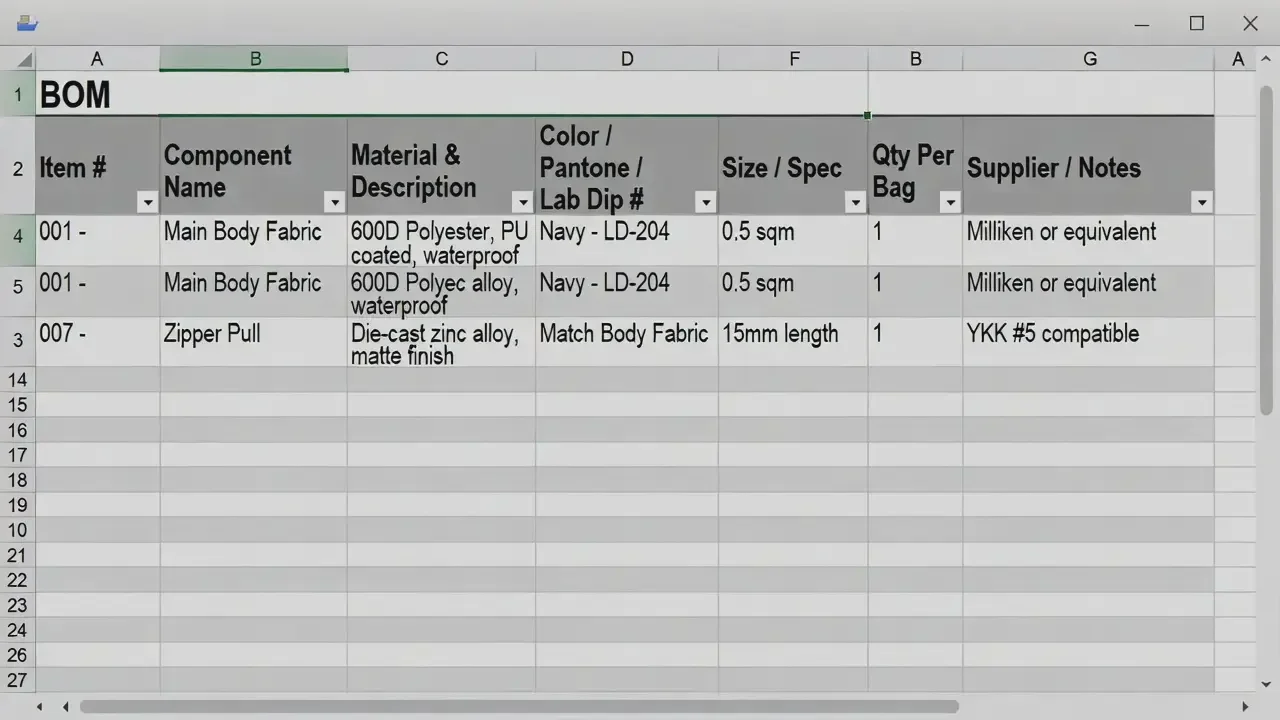
The power of the BOM lies in its specificity. Avoid vague terms like "heavy-duty zipper." Instead, specify: "Nylon coil zipper, size #5 (4-5mm teeth), self-repairing, auto-lock slider, tape color to match Pantone 19-4052 TCX." For fabrics, go beyond "polyester": "300D recycled polyester, hexagon ripstop weave, PU coating for water resistance, 180gsm." List everything: main fabric, lining, interlining/fusible, zippers, pulls, sliders, magnetic snaps, D-rings, webbing for straps, thread (type and color), labels (care, brand, size), hangtags, and even the polybag for packaging. For colors, reference physical lab dips (fabric swatches dyed to your exact color) and Pantone codes for plastics and hardware. This document ensures the factory sources the correct materials and allows you to calculate an accurate landed cost.
The Language of Construction: How Do You Specify Stitching, Assembly, and Details?
Materials and dimensions tell the "what" and "where," but construction notes dictate the "how." This is where you define the quality of assembly, the techniques used, and the finishing touches that elevate your bag from homemade to professional.
Construction specifications translate design aesthetics into factory-floor instructions. They detail stitch types (lockstitch 301, chainstitch 401), stitch density (Stitches Per Inch - SPI), seam types (French seam, bound seam), assembly sequence, hardware attachment methods, and finishing techniques for a clean, durable product.
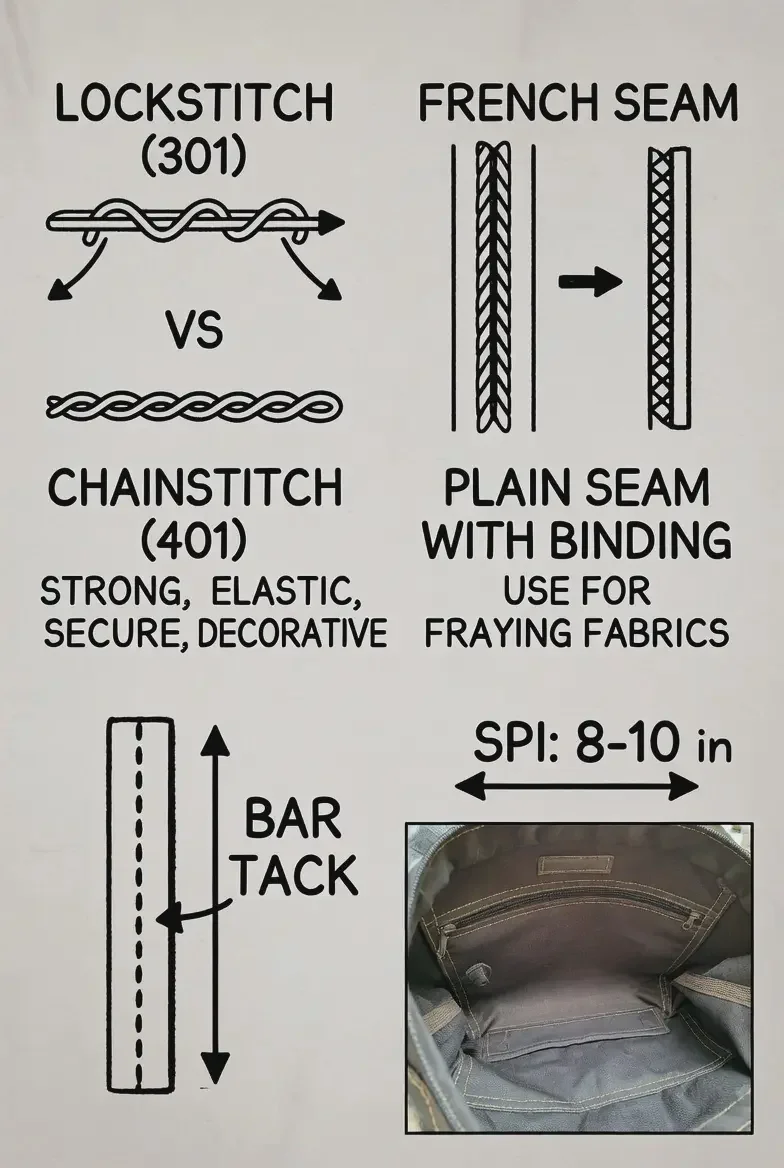
Use industry terminology. Specify "Topstitch: 1/8" from edge, using Tex 40 polyester thread, SPI 8-10." Indicate where reinforcement is needed: "Strap attachments: Double-stitched with bar tack reinforcement." Define how raw edges are finished: "All interior seam allowances: Serged (overlocked) with 4-thread woolly nylon for a clean finish." Don't forget functional details: "Magnetic snap: Insert between exterior and lining, ensure washer is properly crimped on post for security." For complex assembly, an exploded view diagram or a simple numbered assembly sequence can be invaluable. The goal is to remove all ambiguity so that the factory's head sewer and your quality inspector are judging the product against the same standard.
From Paper to Prototype: How Do You Use the Tech Pack in the Sampling Process?
The tech pack is not a static document you send and forget. It is a living benchmark, actively used and referenced throughout the iterative sampling process to steer the factory toward your perfect final product.
The sampling cycle (Proto, PP Sample, Production Sample) is a controlled dialogue in which the tech pack serves as the reference manual. Each sample is rigorously measured, dissected, and compared against every line item and drawing in the pack. Feedback is provided as specific, tech-pack-based corrections, transforming subjective opinions into actionable instructions.
Proto Sample: This first sample, often made from substitute materials, tests the design and pattern. Use your tech pack drawings to check proportions, pocket placement, and functionality. Mark up dimensions that are off directly on the drawing.
Pre-Production (PP) Sample: This is made with actual production materials from your approved BOM. This is the critical sign-off stage. Lay the lab dips and hardware next to the sample. Measure every dimension. This sample must match the tech pack exactly. Your approval here greenlights mass production.
Production Sample: Pulled from the first bulk run. Check against the Quality Standards section of your tech pack, which should define the AQL (Acceptable Quality Level)—the statistically allowed number of minor/major defects. The tech pack ensures quality is measurable, not subjective.
Throughout, provide written feedback that references tech pack items: "Per BOM item 005, zipper should be #5, but sample uses #4. Please correct." This eliminates confusion and accelerates the process.
Conclusion
Creating a factory-ready tech pack is the most significant act of translation in the product development process. It is where the romanticism of design meets the rigor of manufacturing. A comprehensive tech pack does more than instruct a factory; it protects your vision, your budget, and your timeline.
By mastering the creation of detailed technical drawings, a meticulous Bill of Materials, explicit construction specifications, and leveraging this package throughout a structured sampling process, you transition from a designer to a product developer. Your tech pack becomes the single source of truth—a contract of quality and intent that aligns your brand with your manufacturing partner. It turns the complex, often intimidating journey from sketch to shelf into a manageable, predictable process. In the world of manufacturing, clarity is king, and your tech pack is the ultimate expression of that clarity.
[External links recommendation]: